
5 steps for making a Christmas tree
We love group projects. They make creating masterpieces children are proud of possible, they can be worked on over the course of a few days, and they provide each child with the opportunity to add his own personal touch to a collective piece. Preschoolers are especially fond of group projects since they are more and more interested in working with others towards a common goal.
Christmas is just around the corner. Festivities and decorations are showing up here and there. Why not create your own unique Christmas tree this year? This group project comes together in just 5 simple steps. If you wish, you can therefore work on one step each day and make it a week-long project. Feel free to add to my suggestions or modify certain steps per the interests of the children in your group and your schedule.
To complete the five steps, you will need:
- Large pieces of white cardboard
- Brown tissue paper
- Glue
- Green poster paint
- A paintbrush
- Colourful construction paper
- Adhesive tape
- Crayons
- Scissors
- Spray bottles
- Water
- White poster paint
Step 1: The tree trunk
Cut a tree trunk out of the white cardboard. Hang it on a wall. Provide brown tissue paper. Have children tear and crumple tiny pieces of tissue paper and glue them on the tree trunk. Continue until the surface is completely covered with brown tissue paper.
Step 2: Tree branches
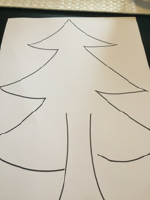
Once the tree trunk is completed and dry. Hang several large pieces of white cardboard above it. Draw a Christmas tree outline on the pieces. Pour green poster paint in a plate. With the paintbrush, children paint the palms of their hands. Once their hands are completely covered with paint, encourage children to press their hands within the Christmas tree outline. Let them repeat this step until the Christmas tree branches are full of pine needles (handprints). Let dry.
See a suggested Christmas tree shape below. Feel free to modify it as you wish.
Step 3: Artificial snow
Once the tree trunk and branches are complete, add artificial snow. Pour white poster paint that you have diluted with water in spray bottles. Let children use the bottles to spray “snow” on their tree.
Step 4: Christmas ornaments
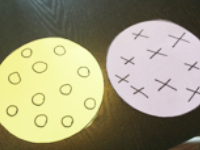
To decorate the tree, you will need ornaments. Trace large circles on colourful construction paper. Have children cut them out (you may need to help younger children). Let children decorate the ornaments with markers as they wish. Suggestion: If you wish, encourage them to draw basic shapes on the ornaments (circles, X’s, horizontal, vertical, and diagonal lines, etc.). See pictures for examples. Let children stick the ornaments on their tree.
Step 5: Garlands
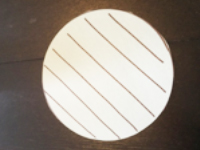
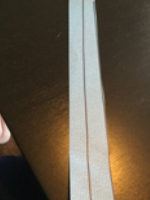
Draw several lines on colourful construction paper, 2-3 centimetres apart (the younger the children, the wider the spaces will need to be). Have children cut along the lines to create strips of paper. Once the strips of paper are cut, use adhesive tape to stick the ends of one strip together to create a loop. Thread a second strip through the loop and tape its ends together and so on, inserting each new strip through the last loop to create a garland as shown.


Follow your creativity and add other elements to decorate the Christmas tree further. Among other things, you may add figurines, stars, squares cut out of wrapping paper to represent gifts, etc. Invite children to think of unique decorations they can add to their tree.
Have fun decorating your Christmas tree!
Maude Dubé, Specialized educator
 Home
Home Theme activities
 Babies and toddlers
 Arts and crafts
 Science
 Creative recipes
 Tips and tricks
 Extra activities
 Educ-TV
 Newsletter
  Online store
 Educatall club